Overriding Angular Material Component Colors
It’s challenging to find resources that extend or modify the component styles and colors of the Angular Material Design framework. Most of the time, the overrides come from hacky solutions that provide a band-aid approach to solving a problem. After diving into the source code and looking through the applied CSS classes and how specific they are, some insight can be obtained.
For example, trying to override the color of an input could go from this:
input.custom-white {
   color: #FAFAFA;
}
To this:
mat-form-field.mat-form-field.mat-white {
&.mat-focused {
  .mat-form-field-label {
      color: #FAFAFA;
  }
  .mat-form-field-ripple {
      background-color: #FAFAFA !important;
  }
}
.mat-form-field-label,.mat-form-field-label.mat-focused,
.mat-form-field.mat-focused.matform-field-should-float {
    color: #FAFAFA;
}
.mat-form-field-underline, .mat-form-field-underline.mat-focused {
    background-color: #FAFAFA;
  }
}
That’s a more detailed example, but the scope is still accurate.
Before beginning this short walkthrough, start by creating an Angular application and installing the Angular Material package and dependencies. You can follow this guide to create a new Angular application. Alternatively, if you already have an application but do not have Material installed, start here.
Now that we have our application up and running with Material components installed, we can start talking about overriding the default Material theme. Without much configuration, the theme can be customized to include brand colors. Unfortunately, there aren’t many options, other than this, for a site to use more than three colors (primary, accent, and warn for errors/warnings) in Material components, or not without some overriding.
To start, we can override the color of a mat-button. For the most part, the default styling of a Material button can be changed quite easily without much force or complex class names. New colors for buttons can be submitted simply by using the .mat- prefix on our custom color class.
For example, if a blue button was desired but blue was not either the primary or accent color defined in your Material theme, a class can be created to be used alongside ‘primary’ or ‘accent’. The override is straightforward for all types of buttons.
Here .mat-blue is defined, the custom color for our button. As you can see, a more specific class is used so we can easily apply the styling to the correct type of button.
.mat-button.mat-blue {
   color: blue;
}

.mat-raised-button.mat-blue, .mat-flat-button.mat-blue{
   background-color: blue;
   color: white;
}
For sake of simplicity, there isn’t much that needs to be done outside of changing the color of the text and the background. We could get more fancy with ripple color and focus attributes, but for now let’s apply these classes to some buttons.
<button mat-button color="blue">Custom Blue Button</button>

<button mat-raised-button color="blue">Custom Blue Button</button>

<button mat-flat-button color="blue">Custom Blue Button</button>
By using the color attribute on the button, we can simply specify the selector ‘blue’ as it was defined in our css file with .mat-blue (Note that using class="mat-blue" is not necessary here!). We could have just applied a base class, but this becomes more extensive with ripple and other color styling further on. The color attribute will allow us to group all of our custom colors into one class, and therefore keep our custom colors separate from any other styling we might have to do.
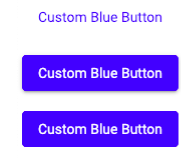
Now, let’s take a look at the buttons, each with their own default styles.

They look a bit bored by themselves, but if we look at a side-by-side comparison with the primary, accent, and warn colors in this theme we can see the similarities that maintain after just changing the color.

After exploring the source code of some of the extensive CSS rules for the Angular Material components, I have found the most important thing to keep in mind when overriding or defining styles and colors is specificity. The more specific the class is that you are targeting, the more likely the style will be applied as intended.
Use descriptions such as:
input.mat-input-element.my-custom-class {
   ...
}
Instead of simply:
.my-custom-class {
   ...
}
The button example covers the basic custom color creation in Angular Material for most components! By changing the other moving parts (ripple, overlay, etc.) that go along with many components similar to buttons, such as tabs and spinners, the customization can become endless (and potentially quite extreme).
One final note: The shadow-piercing selectors that are widely referenced such as /deep/, >>> and ::ng-deep are deprecated as mentioned in the docs, so a large handful of the examples showing how to override styles and color in Angular Material in StackOverflow will not be useful.
For more information or to learn about our web development and design services,
email sales@wildcardcorp.com, or call (715) 869-3440.
