CastleCMS Feature of the Week: In-Page Analytics
One of the great features of CastleCMS is its integration of Google Analytics. Showing information about your website from within a individual page’s editing interface, site administrators can see current site metrics without needing to leave your website.
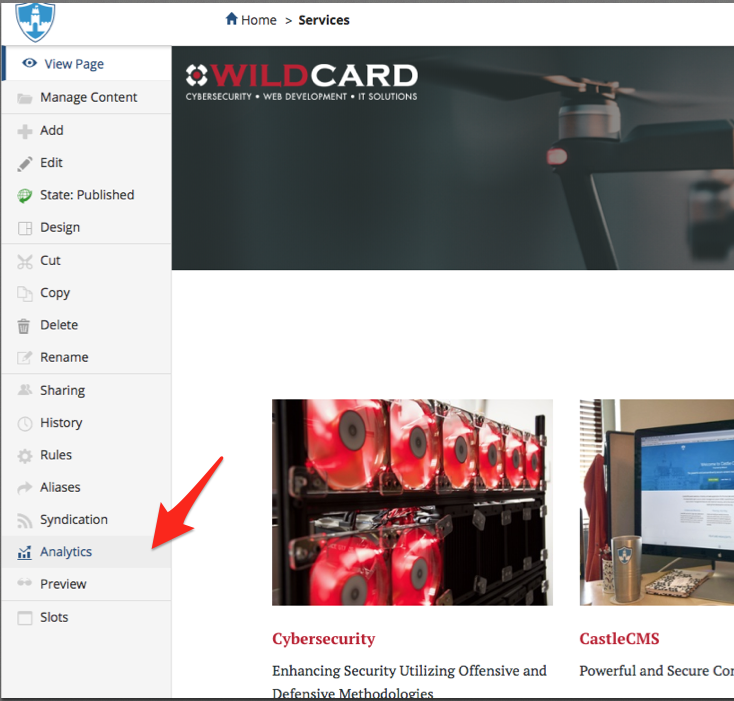
Site administrators can look at a two-dimensional matrix of different aggregates v. dimensions in real time, or over a date range they choose. This can be for an individual page or the whole site.
Dimensions are attributes of your data. The dimension "City" indicates the city, for example, "San Francisco" or "New York", from which a session originates. The dimension "Page" indicates the URL of a page that is viewed.
Aggregates, or Metrics, are quantitative measurements. The aggregate "Sessions" is the total number of sessions. The aggregate "Pages/Session" is the average number of pages viewed per session.
Dimensions include:
- User type
- Session count
- Social network
- Social source referral
- Medium
- Traffic type
- Browser
- Operating system
- Device type
- Page
- Country
- Region
- Continent
- Sub continent
- Metro
- City
- Flash version
- Java enabled
- Language
- Exit page path
Aggregates (Metrics) include:
- Hits
- Users
- New users
- Sessions
- Page views
- Bounces
- Bounce rate
- Average session duration
- Entrance rate
- Page views per session
- Average time on page
- Average page load time
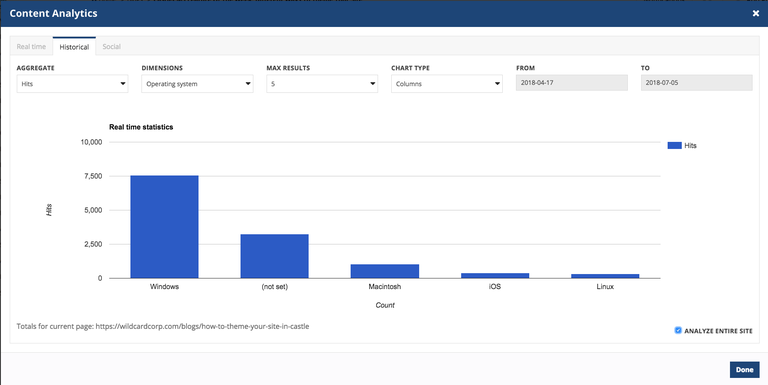
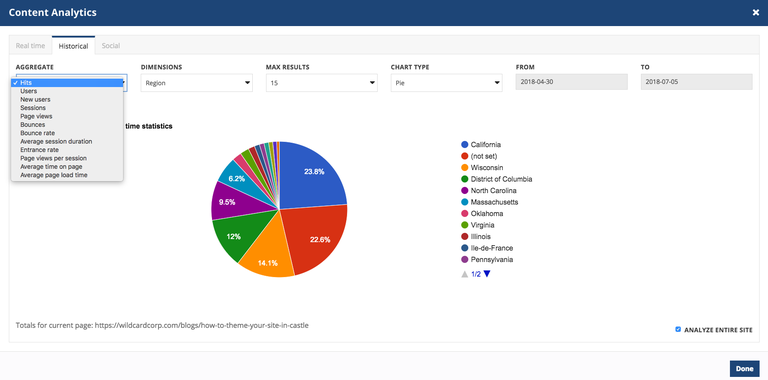
Get results for the top 5, 10, or 15 items visually displayed as a pie chart or bar graph.
Let Wildcard Do the Work for You
Wildcard, when setting up your website, will enable Google Analytics to have access to your site to begin tracking. By adding a few lines of code, analytics will begin to display on your Google Analytics account page.
Set Up Your Site to Work With Analytics Yourself
Setting up analytics on your site can be done in two steps.
- Ensure your website is set up to let Google track and analyze it.
- Authorize your CastleCMS site to show the Google graphs locally.
1.) Ensure Your Website is Set Up to Let Google Track and Analyze It
To do this, you must have a Google Analytics account, and you must place the tracking javascript code segment on your site. Here is a beginners guide you can follow until they begin discussing installing the tracking code into your site.
You will need to copy the tracking code that Google gives you and paste it into your site. This code looks similar to the following with "GA_TRACKING_ID" changed to your ID.
<!-- Global Site Tag (gtag.js) - Google Analytics -->
<script async src="https://www.googletagmanager.com/gtag/js?id=GA_TRACKING_ID"></script>
<script>
 window.dataLayer = window.dataLayer || [];
 function gtag(){dataLayer.push(arguments);}
 gtag('js', new Date());

 gtag('config', 'GA_TRACKING_ID');
</script>
To do this, log into your website as a site administrator and click on the "Cog" in the top right of the screen and click "Site Setup." Once there, click on the “Site” link found in the “General Area."
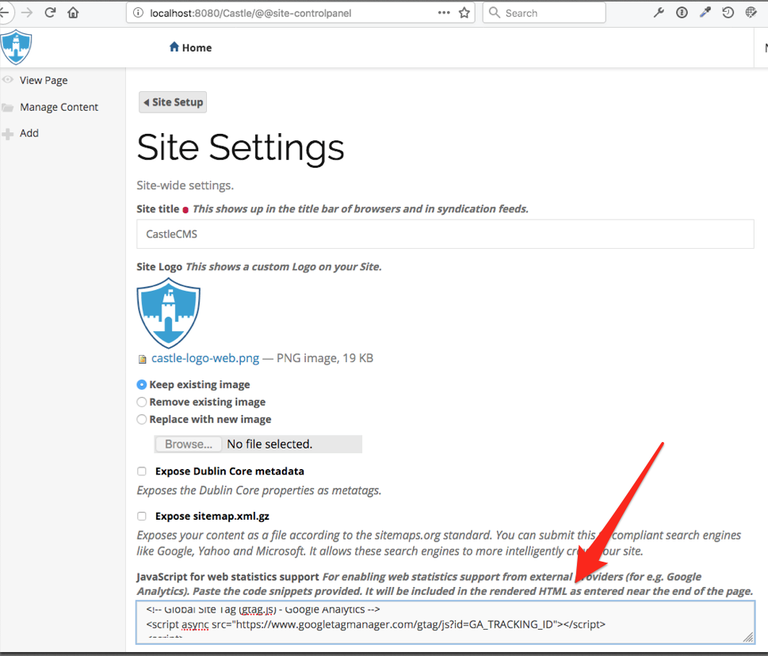
Paste the code into the form field that begins with "Javascript for web statistics support..." and then click "Save." You have completed Step 1! It may take a day or so for the analytics to begin displaying on https://www.google.com/analytics.
2.) Authorize Your CastleCMS Site to Show the Google Graphs Locally.
Google requires you as a website administrator to have a special Google API email account and to have a .p12 certificate bundle file before analytics will fully function on your site. Google has a good web page explaining how to do both of these things. You only need to follow "Step 1: Enable the Analytics API" on this list. Make sure to note what your email API is, and to save the .p12 file somewhere you will remember for a future step.
Once these two tasks are complete, go back to your website and click on the "Cog" icon at the top right of the screen and click "Site Setup" > "Castle". Next, click on the "APIs" tab.
Here you will fill in 3 form fields:
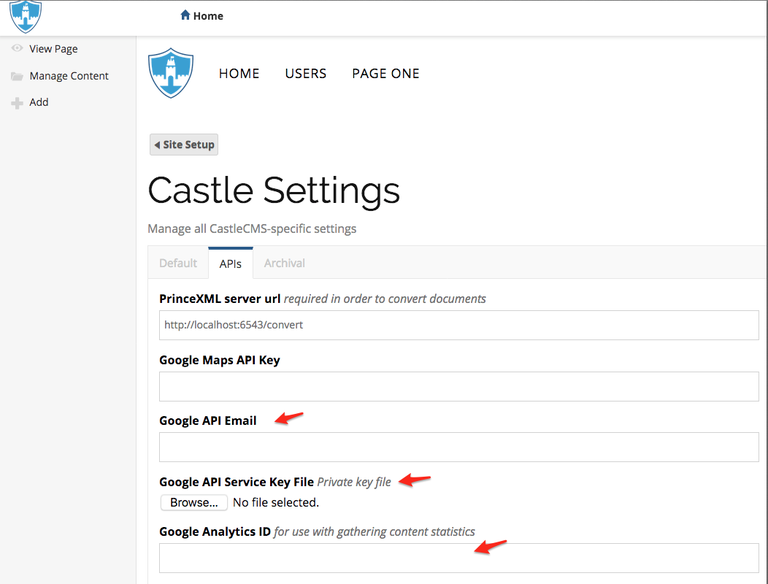
First is the "Google API Email" which you made earlier, and looks similar to:
<projectId>-<uniqueId>@developer.gserviceaccount.com
Second is the "Google API Service Key File" or .p12 that was created. Upload that here.
The third field is the "Google Analytics ID". This is your analytics tracking ID. Usually it starts with "UA-". To find this, follow the steps below.
- Sign in to your Google Analytics account.
- Click "Admin."
- Select an account from the menu in the ACCOUNT column.
- Select a property from the menu in the PROPERTY column.
- Under PROPERTY, click "Tracking Info" > "Tracking Code." Your tracking ID is displayed at the top of the page.
- Copy and paste this ID into the "Google Analytics ID" field on your CastleCMS website.
Your CastleCMS website is fully set up to work with Google Analytics and give you some great insight on how your site is being used.
